DHCP
1. DHCP
1.1. Intro
DHCP (Dynamic Host Configuration Program) is the standard way to
give computers an IP address without the need of configuration on the computer.
DHCP is capable of much more: assigning gateways, netmask, proxies etcetera, basically
all network configuration can be done via DHCP.
If you are a lazy network administrator at home, you probably use the DHCP server in
your Internet router.
In a data centre, DHCP can be used to give control of the network configuration
to the network administrators. Sysadmins only need to use
dhclient
to get an up-to-date network configuration.
There are some problems with DHCP. For example: you need a network layer 2 connection
with the DHCP server.
1.2. Our virtual machines
We'll use Vagrant to start our virtual machines.
# -*- mode: ruby -*-
# vi: set ft=ruby :
# Vagrantfile API/syntax version. Don't touch unless you know what you're doing!
VAGRANTFILE_API_VERSION = "2"
Vagrant.configure(VAGRANTFILE_API_VERSION) do |config|
	config.vm.define :xenial1 do |t|
		t.vm.box = "ubuntu/xenial64"
		# t.vm.box_url = "file:////links/virt_comp/vagrant/boxes/xenial64.box"
		t.vm.provider "virtualbox" do |prov|
			prov.customize ["modifyvm", :id, "--nic2", "hostonly", "--hostonlyadapter2", "vboxnet1" ]
			prov.customize ["modifyvm", :id, "--macaddress2","020000000001" ]
		end
		t.vm.provision "shell", path: "./setup.xenial1.sh"
	end
	config.vm.define :xenial2 do |t|
		t.vm.box = "ubuntu/xenial64"
		# t.vm.box_url = "file:////links/virt_comp/vagrant/boxes/xenial64.box"
		t.vm.provider "virtualbox" do |prov|
			prov.customize ["modifyvm", :id, "--nic2", "hostonly", "--hostonlyadapter2", "vboxnet2" ]
			prov.customize ["modifyvm", :id, "--macaddress2","020000000002" ]
		end
		t.vm.provision "shell", path: "./setup.xenial2.sh"
	end
	config.vm.define :xenial3 do |t|
		t.vm.box = "ubuntu/xenial64"
		# t.vm.box_url = "file:////links/virt_comp/vagrant/boxes/xenial64.box"
		t.vm.provider "virtualbox" do |prov|
			prov.customize ["modifyvm", :id, "--nic2", "hostonly", "--hostonlyadapter2", "vboxnet3" ]
			prov.customize ["modifyvm", :id, "--macaddress2","020000000003" ]
		end
		t.vm.provision "shell", path: "./setup.xenial3.sh"
	end
end
A bit special here is the
prov.customize ["modifyvm", :id, "--macaddress2","020000000003" ]
which forces a specific MAC-ID on eth1. The reason for this is that it allows me to
create a static lease easily.
All setup-scripts contain the following code:
ETH1=$(dmesg | grep -i 'renamed from eth1' | sed -n 's/: renamed from eth1//;s/.* //p')
ifconfig $ETH1 down
ip link set $ETH1 name eth1
ifconfig eth1 up
2. Installing a DHCP server
2.1. Installing the software
We'll use xenial1 as our DHCP server. Installing is default:
apt-get install dhcpd
This makes the setup for xenial1 as follows:
#!/bin/bash
ETH1=$(dmesg | grep -i 'renamed from eth1' | sed -n 's/: renamed from eth1//;s/.* //p')
ifconfig $ETH1 down
ip link set $ETH1 name eth1
ifconfig eth1 10.168.65.101 netmask 255.255.255.0 up
route add -net 10.168.0.0 netmask 255.255.0.0 gw 10.168.65.1
apt-get install dhcpd
cp /vagrant/udhcpd.conf /etc
cp /vagrant/udhcpd.default /etc/default/udhcpd
/etc/init.d/udhcpd restart
2.2. Configuration
The setup-script copies a configuration from our
/vagrant
directory. The content of
udhcpd.conf
is:
# Sample udhcpd configuration file (/etc/udhcpd.conf)
# The start and end of the IP lease block
start          10.168.65.200
end            10.168.65.250
interface      eth1
static_lease	02:00:00:00:00:02	10.168.65.55
static_lease	02:00:00:00:00:03	10.168.63.222
option  subnet 255.255.255.0
opt     router 10.168.63.1
option  lease  30
We see the
static_lease
for the MAC-IDs that we defined in our vagrant file. We also see that the router is defined as
10.168.63.1. We're not really interested in routing here, and because xenial1 is here the
center of our universe, we're only interested in getting traffic to xenial1. We do not care that this
router information is invalid for xenial2.
The lease time is short, because I do not want to wait long wth wireshark.
2.3. A simple network for DHCP testing
In GNS3, I created the following network.
Precise1 is on vboxnet1; xenial2 is on vboxnet2.
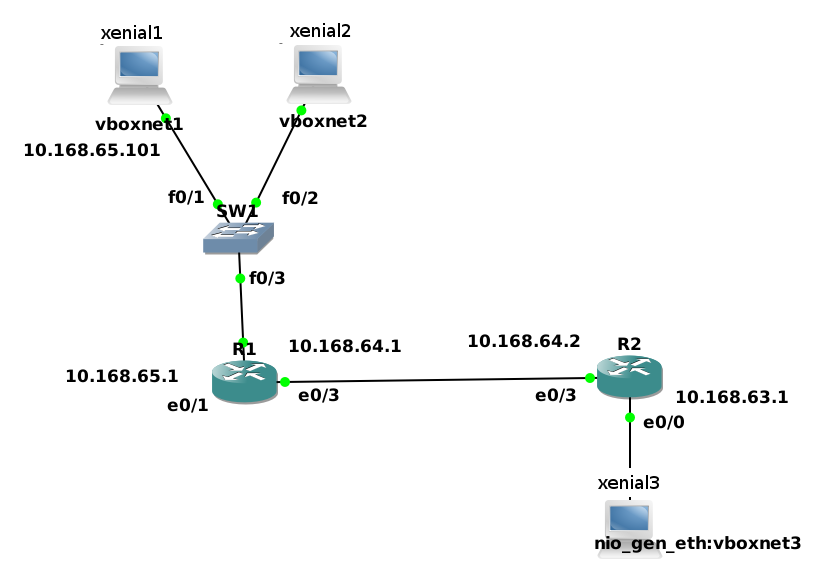
The switch is a standard GNS3-switch.
When xenial2 is started, it generates dhcp requests. This is directly visible
on the console as a series of
Sending OFFER
and
Sending ACK
with the IP address.
# pkill udhcp
#
# udhcpd -f
udhcpd (v1.18.5) started
udhcpd: max_leases=235 is too big, setting to 51
Sending OFFER of 10.168.65.55
Sending OFFER of 10.168.65.55
Sending ACK to 10.168.65.55
Sending ACK to 10.168.65.55
Sending ACK to 10.168.65.55
Sending ACK to 10.168.65.55
An
ifconfig eth1
on xenial2 will show that the predicted IP address is present on that interface.
$ ifconfig eth1
eth1      Link encap:Ethernet  HWaddr 08:00:27:9d:73:b6
          inet addr:10.168.65.55  Bcast:10.168.65.255  Mask:255.255.255.0
          inet6 addr: fe80::a00:27ff:fe9d:73b6/64 Scope:Link
          UP BROADCAST RUNNING MULTICAST  MTU:1500  Metric:1
          RX packets:74 errors:0 dropped:0 overruns:0 frame:0
          TX packets:28 errors:0 dropped:0 overruns:0 carrier:0
          collisions:0 txqueuelen:1000
          RX bytes:17440 (17.4 KB)  TX bytes:6492 (6.4 KB)
3. DHCP forwarding
It is all very well to have a DHCP server in the same VLAN, but if you have
different VLANs or network segments separated by a router, you'll need a forwarder
on the router to get your DHCP request at the DHCP server. We'll implement the
forwarder on a network further away.
3.1. The basic network set-up
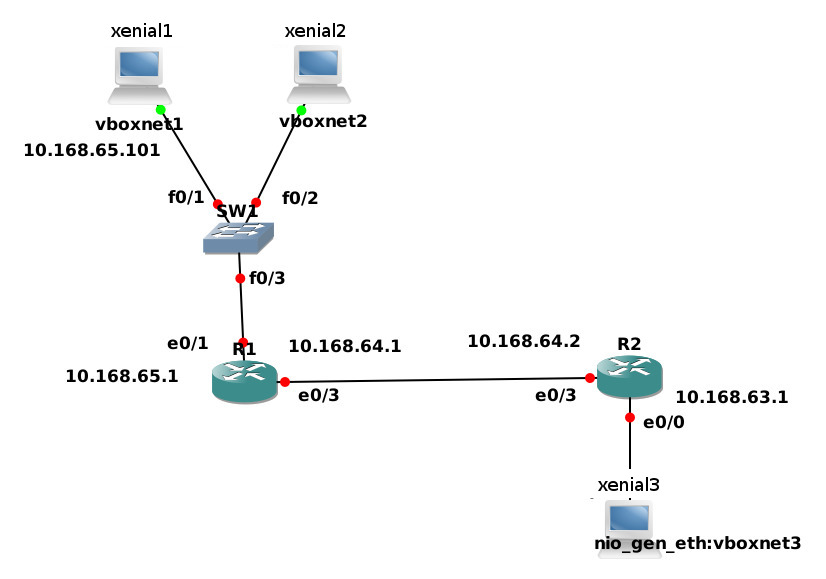
Between the DHCP server xenial1 and the possible client xenial3 there are now two
routers. We'll set them up in static routing; this will avoid routing messages to
apear in out wireshark traces.
For R1:
interface Ethernet0/1
 ip address 10.168.65.1 255.255.255.0
 no shut
!
interface Ethernet0/3
 ip address 10.168.64.1 255.255.255.0
 no shut
!
ip route 0.0.0.0 0.0.0.0 10.168.64.2
and for R2:
interface Ethernet0/0
 ip address 10.168.63.1 255.255.255.0
 no shut
!
interface Ethernet0/3
 ip address 10.168.64.2 255.255.255.0
 no shut
!
ip route 0.0.0.0 0.0.0.0 10.168.64.1
Now you should be able to ping xenial1 (10.168.65.101) from R2.
3.2. Normal DHCP
If you are in the same L2-network, you can do a DHCP request. Precise2 is in the
same L2 network.
vagrant@xenial64:~$ ifconfig eth1
eth1      Link encap:Ethernet  HWaddr 02:00:00:00:00:02
          BROADCAST MULTICAST  MTU:1500  Metric:1
          RX packets:0 errors:0 dropped:0 overruns:0 frame:0
          TX packets:0 errors:0 dropped:0 overruns:0 carrier:0
          collisions:0 txqueuelen:1000
          RX bytes:0 (0.0 B)  TX bytes:0 (0.0 B)
vagrant@xenial64:~$ sudo dhclient eth1
vagrant@xenial64:~$ ifconfig eth1
eth1      Link encap:Ethernet  HWaddr 02:00:00:00:00:02
          inet addr:10.168.65.5  Bcast:10.168.65.255  Mask:255.255.255.0
          inet6 addr: fe80::ff:fe00:2/64 Scope:Link
          UP BROADCAST RUNNING MULTICAST  MTU:1500  Metric:1
          RX packets:9 errors:0 dropped:0 overruns:0 frame:0
          TX packets:6 errors:0 dropped:0 overruns:0 carrier:0
          collisions:0 txqueuelen:1000
          RX bytes:1040 (1.0 KB)  TX bytes:1012 (1.0 KB)
vagrant@xenial64:~$ ping -c1 10.168.65.1
PING 10.168.65.1 (10.168.65.55) 56(84) bytes of data.
64 bytes from 10.168.65.55: icmp_req=1 ttl=64 time=0.029 ms
--- 10.168.65.1 ping statistics ---
1 packets transmitted, 1 received, 0% packet loss, time 0ms
rtt min/avg/max/mdev = 0.029/0.029/0.029/0.000 ms
vagrant@xenial64:~$
3.3. DHCP forwarding
If you now try a
dhclient eth1
on xenial3, you'll get no reply. This is because the broadcast that xenial3 does gets stopped
at the router. DHCP Discovers are not routed; they can't be. The destination is 255.255.255.255 and the
source is 0.0.0.0. We'll need some translation to convert this broadcast to a unicast.
On Cisco, there is an IP helper. This relays broadcasts to a helper address. This is protocol
independent, so it works for all sorts of broadcasts, and therefore with DHCP.
Configure the router to relay the DHCP requests. This is done on the interface
so for R2 in this configuration:
interface e0/0
 ip helper-address 10.168.65.101
Finally, we start a
dhclient eth1
on prcecise3. Verifying with
ifconfig
we see that eth1 now has the IP address 10.168.65.222, just as we expected.
To see what the helper does, we start a wireshark trace on the link between R1 and R2.
First the discover:
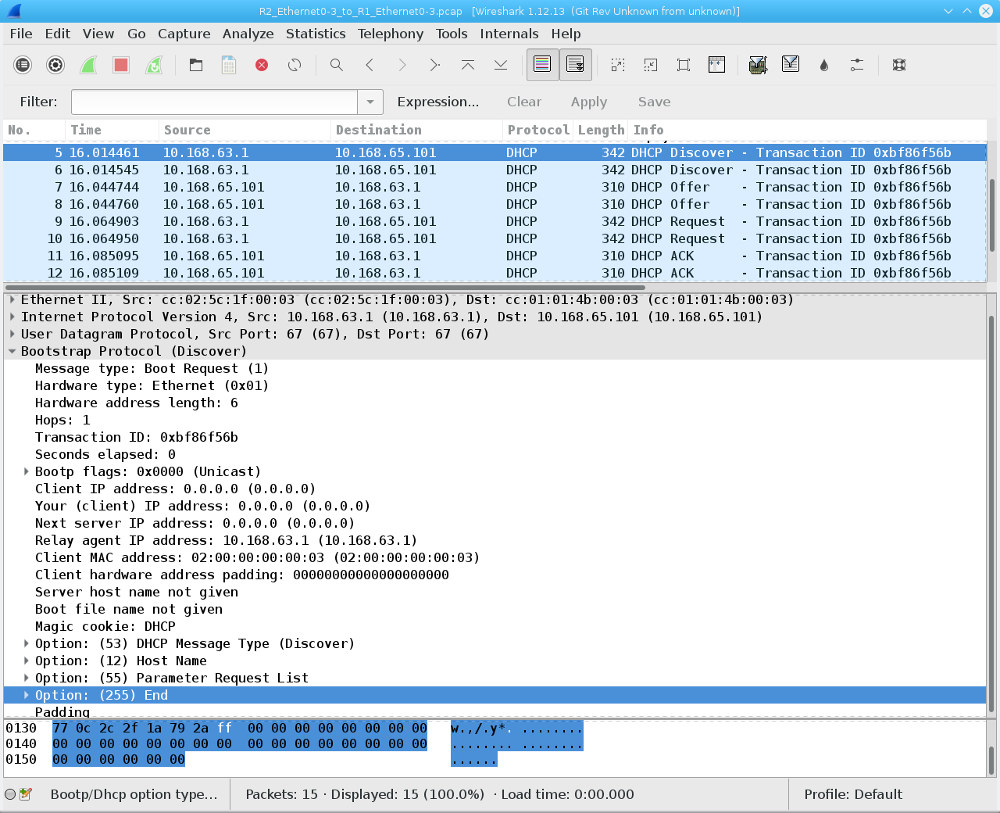
We see an UDP packet with the source 10.168.65.1 (the router interface that has the relay on it)
and the destination 10.168.65.101 (the DHCP server). This is effectively a unicast version of
the original broadcast. In the information of the Bootstrap Protocol, we see that the client IP is
still 0.0.0.0 and we see the mac-id.
As a reply, we see the DHCP offer:
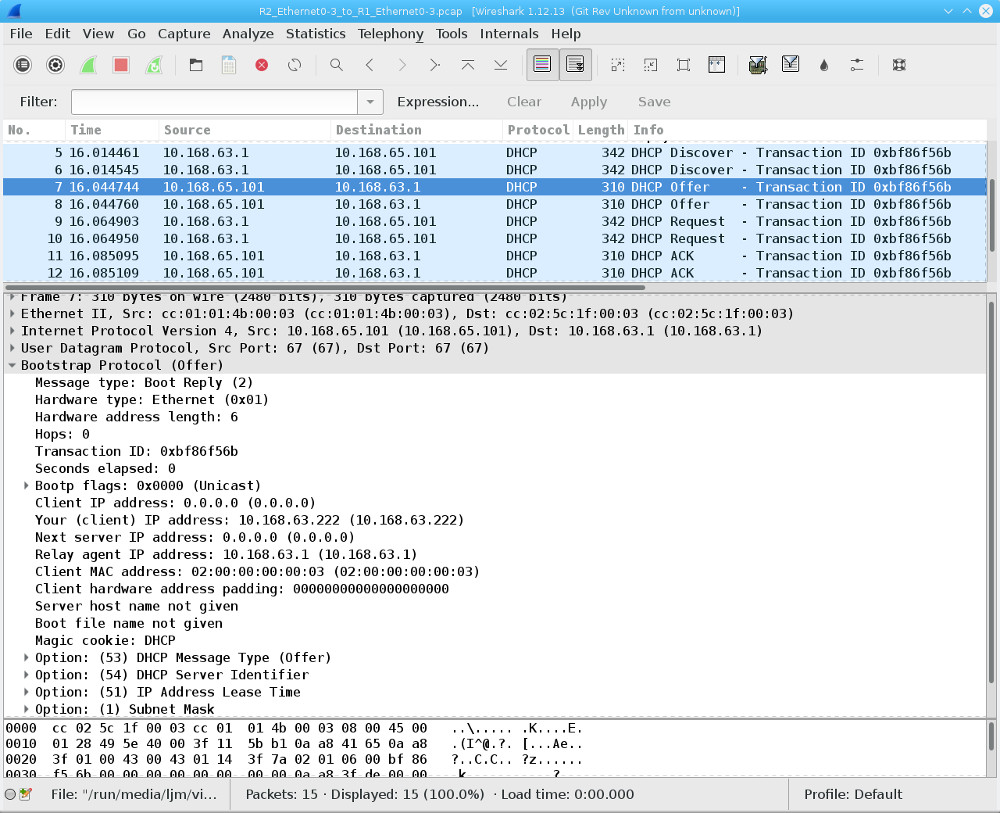
Now the source is the DHCP server and the destination is the interface that does the relay. The
relay agent will send the answer to the DHCP client.
1
|
sept 2016
|
creation
|
2
|
verified
|
2018-04-29
|
3
|
upgraded to xenial
|
2020-02-04
|