
Changing Distributions
Back to Slackware/Salix
1. A new distribution
1.1. The problems I have
I have always been a fan of RedHat, Fedora Core and Fedora. However,
I am becoming more and more frustrated with Fedora. My main problems
are
-
the quick release cycles
-
systemd
-
complexity
I am more and more depending on my computer. It must work, otherwise
I have a problem. And I do not feel like updating this often anymore.
So I need a more stable distribution.
There is a lot of controversy about systemd. Proponents say it is the
future and that anyone avoiding systemd is stupid. The only argument
that proponents uses and that has any substance is that it should
speed-up boot times by starting things in parallel.
My observations about systemd are, that boot-times are significantly
longer with systemd.
In additions, from Fedora23 on, I have all kind of problems (most of
the system hangs, devices are not recognized when plugged-in,
NFS troubles,
etcetera), and the solution is always
systemctl --system daemon-reload
, which works, but if I have to reload systemd more often than I had
to reboot Windows, something tells me that this is not the way to go.
What annoys me the most is that the
vast majority of pro-systemd arguments are ad-hominen arguments. People
that don't like systemd are "Luddite", they "are afraid to learn",
"go away, you’re clueless, we know better than you, and besides,
we have commit privs and you don’t, so go away", while the vast
majority of the anti-systemd arguments are based on technical content
(except, possibly, for the
rants directed at
Poettering/Sievers).
The reason whys, for example, Archlinux went to systemd is even worse:
"We had problems and we stopped thinking.`"
Another thing is security. In the discussions about systemd, it is often said
that systemd is less secure because it is more complex. For me, the
complexity is not
really an argument; complex systems may be secure.
However, if we compare the number of CVEs in the last 10 years,
we find that systemd has 27 CVEs and, for example, SysV init has 0.
In stead of the simple logic of Unix-like systems, Fedora is apparently
seeking to make things a complex as possible. Many undefined inter-dependencies
make it, at least for me, harder and harder to get things done. For example:
I have not been able to make the combination of Dracut, systemd and the
propriety NVIDIA drivers working consistently. For me, it meant going
back to the Nouveau-drivers and booting in text-mode.
1.2. Selecting a new distribution
So, a new distribution.
I have used many different distributions: Debians (x86, NSLU2, Pi), Fedora, Mint,
Puppy, Slackware. I have even used Soft Landing and a version that needed to
be cross-compiled (ACME's Foxboard). I have a slight preference for the KDE-desktop.
The table below is my short-list of Linux distributions. The short-list is, admittedly, a bit
arbitrary. But also the criteria "complexity" and "desktop use" are more
my personal opinion than an objective criterion.
distribution
|
release
cycle
|
systemd?
|
KDE?
|
complexity
|
desktop
use
|
Arch
|
rolling
|
yes
|
yes
|
high
|
yes
|
SUSE
|
12 months
|
yes
|
yes
|
high
|
no
|
Ubuntu
|
6months/2yr LTS
|
yes
|
yes
|
high
|
yes
|
Mint
|
6months/2yr LTS
|
yes
|
yes
|
high
|
yes
|
Fedora
|
6months
|
yes
|
yes
|
high
|
yes
|
Puppy
|
2yr lts
|
no
|
possible
|
low
|
yes
|
Salix
|
long/rolling
|
no
|
yes
|
low
|
yes
|
Slackware
|
long/rolling
|
no
|
yes
|
low
|
no
|
PCLinuxOS
|
rolling
|
no
|
yes
|
low
|
yes
|
The results of this table are that I should give Salix and PCLinuxOS a try.
It is worth noting that Salix is basically Slackware with a user-friendly sauce
over it.
Looking at PCLinuxOS, I did not like it. I don't know why. No technical reason, just
my preference.
So, Salix it is.
2. Salix, first try

2.1. Downloading
To download, you can use a direct download or a download via torrent.
Because there are very few seeders, downloading from Sourceforge is
the way to go.
I downloaded the Salix64 Xfce 14.2 DVD ISO (x86_64, 64-bit).
2.2. Install in VirtualBox
Because I do not want to rush into things and I like to get a feeling
before I totally commit myself, I first installed on VirtualBox.
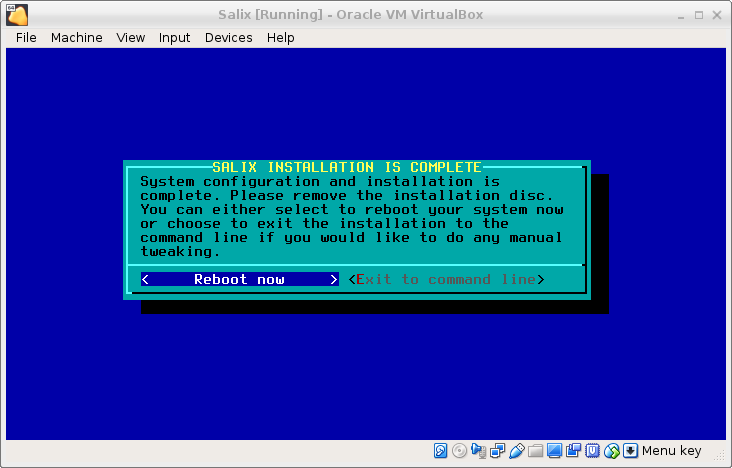
The installation is smooth. It requires some manual answers and it
has the simplicity of a Slackware install. The installation itself
gave no problems.
After the installations, I wanted to use the full-screen mode and for
that you need to install Vbox guest additions. To install them, you
need the kernel source. However, the kernel source package is of
a newer date than the actual kernel.
The solution is to bring all the kernel packages to the latest version.
Salix has the idea, that you need to update the kernel, and some other
packages, conscientiously. That mean that you cannot do it via the GUI.
Updating the kernel proved to be rather simple. First update
glibc
from the command line:
slapt-get -i glibc
next, for all kernel packages in
ls /var/log/packages/*kernel*
do a
slapt-get -i.
For me (clean Salix 14.2), that meant:
slapt-get -i kernel-firmware
slapt-get -i kernel-headers
slapt-get -i kernel-huge
slapt-get -i kernel-modules
slapt-get -i kernel-source
The
kernel-source
was not installed, but it was needed for the guest additions. To be sure, do a
lilo -v
and reboot. Then it all should work.
2.3. Init
In fact: it is the simplest way to initialize the system.
3. Packages and their problems
3.1. Scanner, USB stuff
It seems practically impossible to test the scanners under VirtualBox. There is a
process under Fedora that steals the access to the devices from VirtualBox
(not only the scanners, but also webcams, hard drives, bridged network adapters etc.) As this is a
VirtualBox or Fedora problem,
the scanners will have to be tested after the first install.
Note that I have tried to do the scanning on a Windows 10 virtual machine, and that also
fails.
3.2. Diaadm.imagebank
I have a script that administrates my slides and digital images. It is a TCL/TK script
that uses a mysql database for storage. Or a maria db.
Under Salix, maria db is already installed. TCL is not; so install:
slapt-get -i tcl tk mysqltcl
Next, configure the mariadb. This is well documented.
As root
mysql_install_db
chown -R mysql.mysql /var/lib/mysql
chmod 755 /etc/rc.d/rc.mysqld
/etc/rc.d/rc.mysqld start
-Set root (master) password
mysqladmin -u root password 'NEW_PASSWORD'
And then some script-specific things:
bash create__db.sh create
bash create__db.sh import diaadm.dump
The library for the mysql-TCL is, on Slackware, in a different location than
on Fedora. For the test, I made a link instead of changing the script. And then:
wish imagebank.tcl
And :

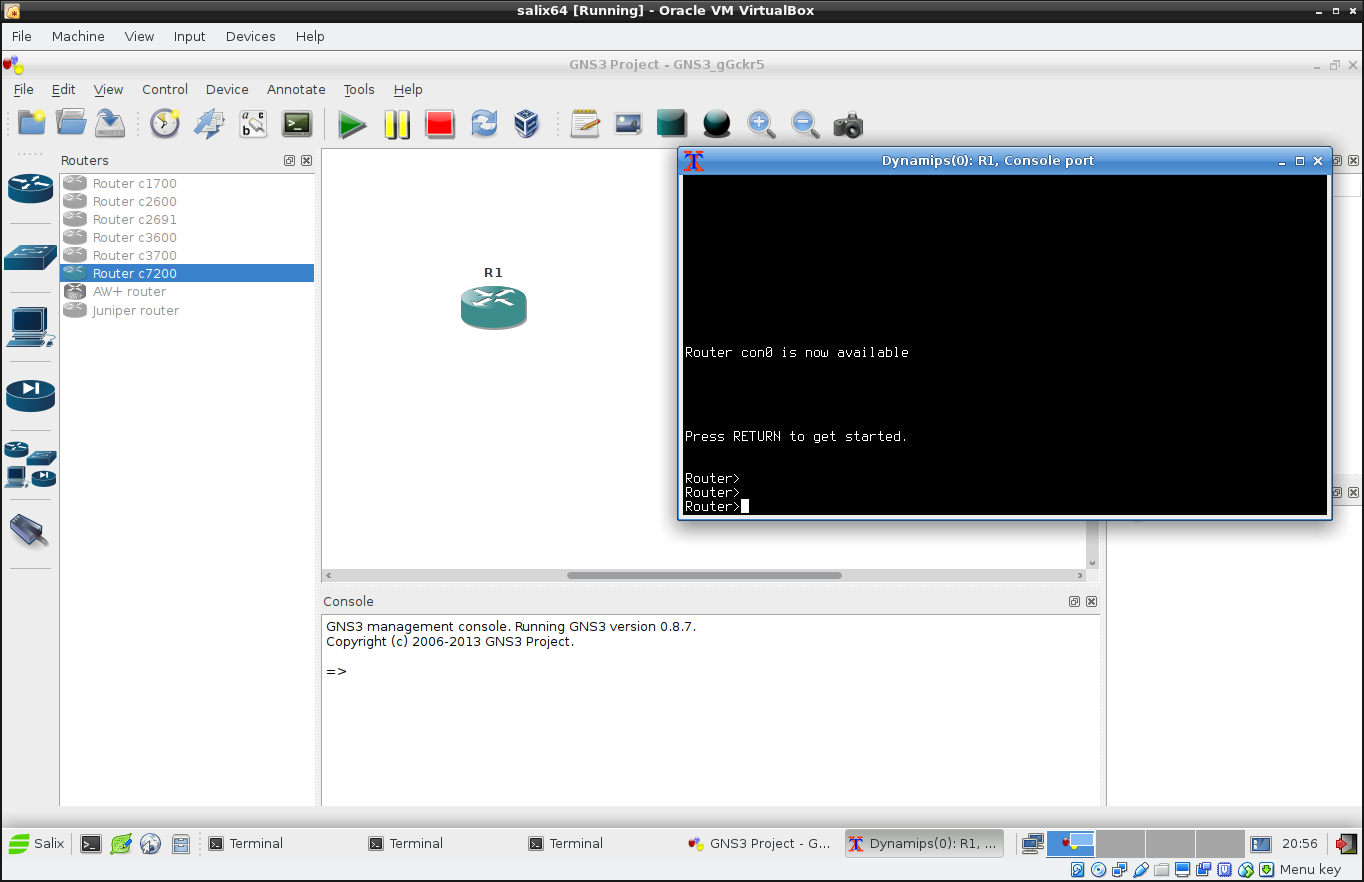
3.3. GNS3
To my surprise, you can install GNS3 with
slapt-get.
Of course, you need a lot of dependencies:
slapt-get -i python3
slapt-get -i PyQt PyQt5 python3-PyQt5
slapt-get -i gns3 dynampis qemu
Virtual PCs (VPCS)
must be downloaded from Sourceforge. You can download a binary.
When testing, I found that gns3 also needs the package xterm. Of course, you can
tell gns3 to use another terminal, but
slapt-get -i xterm
is not that much trouble.
The result is a working gns3:
3.4. VirtualBox
Nesting VirtualBox is not possible. That is also something that has to be tested
in a real installation.
3.5. NVIDIA drivers
VirtualBox has its own display, so it is not possible to try the NVIDIA propriety drivers.
4. Live
4.1. Using the live distribution
The VirtualBox experience gave me enough confidence that Salix is the distribution for
me. For every problem or unknown that I encountered, there was a web-page that explained
the issue. It seems that Salix is better documented than Fedora at the moment.
But once again, I do not like to rush into things. I
have not been able to test the USB-stuff, some of which are
very important to me.
So, on the live version, I should be able to test those.
4.2. Problems with the Live version
The problems I encountered were due to a faulty DVD player. The solution
was to boot from USB stick. On the Salix docs-site, they say that you should do
all sorts of complicated things if you want to use the USB installer. I simply
did:
dd if=salixlive64-xfce-14.2.1.iso of=/dev/sdg status=progress
(
/dev/sdg
is the USB-drive) and that gave me a working USB-Salix-LIVE stick.
I also tried Unetbootin, but I ended up with non-working sticks. As
docs.salix.org
says, Your mileage may vary.
Before you can install anything, you need to update the package list. This
is a bit an issue, because the live-DVD uses hostingxtreme, which apparently
stopped service for Salix. This means that
reposetup
will hang.
The solution is to specify a mirror manually, and then select the correct
one.
Get a repository from
reposetup -m ftp://ftp.nluug.nl/os/Linux/distr/salix/
reposetup
and then select the closest to home.
Next, do a
slapt-get -u
and everything should be in order.
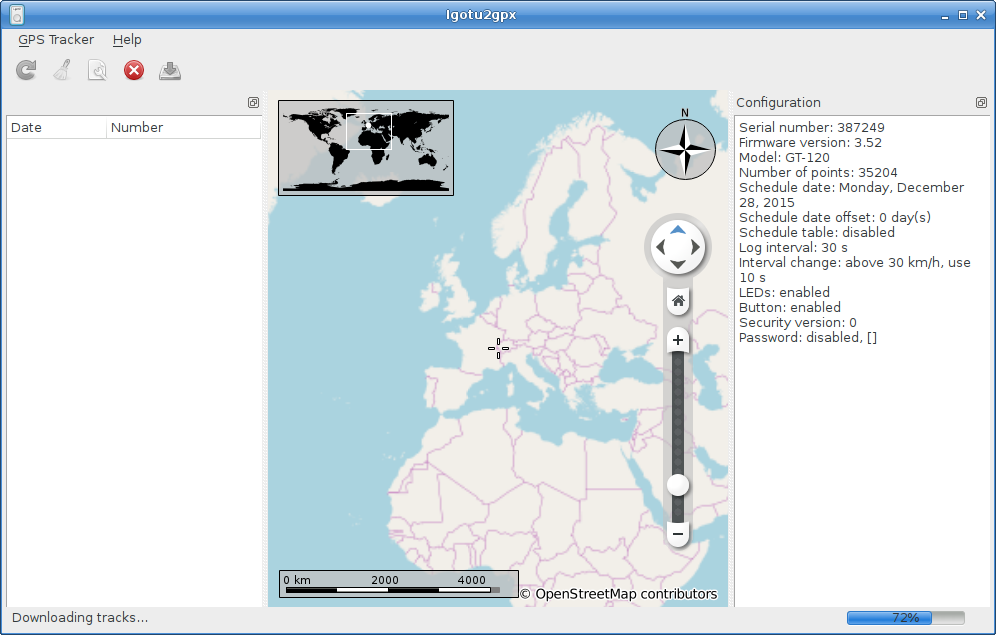
4.3. Igotu
I have a small GPS-tracker that is supported a bit under Linux. It is called Igotu.
I use version 0.3.90. The drivers and supporting programs must be compiled; there is
no package available (not for Slackware, but on Fedora it wasn't either).
First install the pre-requisites:
slapt-get -i qt boost libusb chrpath marble openssl
There is a slight difference in locations for libraries in Slackware. A simple link
solves that problem:
ln -s /usr/lib64/qt /usr/lib64/qt4
and then the magic incantations:
qmake
make clean
make
make install
And once again, it simply works.
4.4. NVIDIA drivers
One of the problems with Fedora was that I could not get the NVIDIA propriety
drivers work
consistently
together with Dracut and systemd. The problem was that, if one of them had an
upgrade (which was often enough in Fedora) booting would just fail and it became
difficult to access the system, depending on which upgrade was done. To be able to access
my Fedora, I had to go back to the Nouveau drivers and text-mode boot.
One of the nice things about Slackware and Salix is that you need to upgrade some
packages like the kernel specifically. If you do an "upgrade all", these packages
are excluded. That means that your propriety drivers keep on working normally.
For me, the fact that my boots work reliably is a huge advantage of Salix over
Fedora.
The NVIDIA drivers are now considered legacy drivers. NVIDIA states on the website
that they will be updated for new kernels or X upgrades, but for newer video cards,
the drivers are now part of the mainstream kernel. That would mean that this problem
is limited to the video cards that require a legacy driver. Unfortunately,
that means all my computers with NVIDIA cards.
To get the right version of the driver, check NVIDIA's download drivers site. For
my GEFORCE 8600 GT, that is version 340.102. However, the normal installation requires
a reboot. And with the reboot, I loose everything, because we're still on the live-CD
version.
4.5. Scanners
Somehow, getting scanners to work always is more difficult than it should be. I have
two scanners that need to work, an Nikon Coolscan IV and an Epson Perfection V200, and
both need to work with
Vuescan
and
Xsane.
I installed both. For Vuescan, I did not copy the license-key from the old installation.
It is sufficient for me to know that it works; I do not plan to do real scanning from
the live-DVD version.
4.5.1. Coolscan
The easiest is to get the Nikon Coolscan to work. Connect, launch Vuescan and scan
the first slide. Xsane takes a bit longer, because it apparently wants do do something
with the Epson scanner. But all in all: no problems here.
4.5.2. Epson V200
How different it is with Epson. Epson provides its own drivers and scanning
software, Iscan. There are different download options:
Rpm and deb does not work on Slackware, so I downloaded the source version. And that
does not compile. There are problems with the png libraries. Of course, there are
others that have made packages, but somehow they all seem to fail at some point.
Most of them have libusb problems.
Under "Iscan and Sane / Xsane", you'll find that you need to add
epkowa
to
/etc/sene.d/dll.conf.
In addition, you will probably need to comment-out the
epson2
dll. The second seems to confuse all programs.
4.6. VirtualBox
The easiest way to install VirtualBox is to use Sourcery. Type virtual in the
search box and tag all the VirtualBox-items. Press the execute (green v) and
watch it fail.
Eh, that is not what I wanted?
If you look at the log, you will see why it fails. For me, these were the
reasons:
groupadd -g 215 vboxusers
slapt-get -i acpica kernel-source
And then there is a complaint that the disk space isn't enough. Which is a pity,
but it was predictable that the disk space on a live-DVD would not be unlimited.
All in all, there are but few problems known with the installation of VirtualBox
on Slackware.
4.7. Conclusion
The live-DVD/USB stick gave me the opportunity to do some additional tests, all
of them were successful. This gives me the confidence to go ahead. I will now first
upgrade my desktop (still on Fedora 15!), which I have not used for quite a while.
5. Install and config
5.1. Installation
The biggest problem for the installation is to make sure
that you use the correct hard drive.
You must change the site for the mirror, because the default
site is no longer available. I used the NLUUG.
5.2. Configuration
Configuring should be as less as possible a manual action.
Of course, the first time you need to get a working environment,
you do not think about it that way. However, it is good to do it
if you get to your third installation (desktop, server and now
a laptop)
So, the strategy is to do a minimal instalation by hand and try to
do the rest with Ansible. For me. that means:
-
set-up the network, which means different things for the laptop or the desktop/server
-
install slackpkg (
sudo slapt-get -i slackpkg
) which is used by Ansible to install packages, and edti
/etc/slackpkg/mirrors
to get the corect mirrors for the packages.
-
set-up password-less sudo (with
visudo
)
-
distribute ssh-keys for password-less login
This is basically the same as for a raspberry pi.
6. Packages and some remarks
6.1. General
There are some issues with the main repository for Salix. As said before, the solution is:
reposetup -m ftp://ftp.nluug.nl/os/Linux/distr/salix/
reposetup
6.2. Blender
Blender
is a 3d sketch program. It is complicated and takes a lot of practice
to get anything useful from it. Download the latest version from their website.
6.3. Calibre
Calibre is a e-book management program. Sorry,
THE
e-book management program.
The best way to install it is to use Calibre's binary install:
wget -nv -O- https://download.calibre-ebook.com/linux-installer.sh | sudo sh /dev/stdin
The complete library is under
Calibre Library
(directory name contains a space), so if you have a backup of that, Calibre will
find all your books.
6.4. GNS3
GNS3 is an installable package in Salix. Although it may
not be the latest and greatest, it works for me.
I installed GNS3 through gslapt ans installed dynamips too. In addition,
you will need PyQT (version 4).
Because I need some specific interfaces to OS services, GNS3 must run as
root. This is an issue if GNS3 runs on a remot machine. I use the following script to start GNS3:
#!/bin/bash
#INSTALL@ /usr/local/bin/gns3
xal=/tmp/$$.xal
xauth list > $xal
wd=`pwd`
sudo sh -c "xauth add `cat $xal | grep -v localhost | tail -1`; /usr/bin/gns3 $wd/topology.net"
In addition to PyQT, additional packages should be installed to get
a working setup.
I installed the following list:
There are some remarks. Because I connect my VirtualBoxes via
vboxnets and I use Vagrant to start them, I did not look into
vbox integration.
Visit edit -> preferences and all the tabs to get things working.
I wanted to get qemu working, but it is a mess. Qemu provides different
binaries, depending on the architecture. But GNS3 only accepts a single
binary. So I when I will actually need qemu, I will examine this further.
Next, add the Cisco IOS images that you have procured under edit->IOS images and hypervisors.
6.5. Igotu and Viking
slapt-get -i qt boost libusb chrpath marble openssl
ln -s /usr/lib64/qt /usr/lib64/qt4
qmake
make clean
make
make install
You may have to add
/usr/local/lib
to
/etc/ld.so.conf
and run
ldconfig.
Viking is just an installable package.
6.6. Iscan, SANE, vuescan
For all your other scanners, Vuescan and Sane just works. For Vuescan, remember to
save your license!
6.7. Sweet Home 3d
For some planning in the house, I use
Sweet Home 3D.
Use the Installer from their website.
There may be some issues when importing furniture.
6.8. VirtualBox and Vagrant
Although there is a package for VirtualBox, I downloaded the most recent version
from
https://www.virtualbox.org/
and ran the installer-script.
To my experience, whether you use pre-packaged
VirtualBox or via the Oracle installer, there is always
some fine-tuning necessary. Some additional tolerance between
the vbox-addons and the VirtualBox versions has greatly reduced
the need for tweaking.
However, there are a number of things that I encountered:
-
In the documentation, VirtualBox says that you need to install the kernel
headers. However, in my experience, you need to install the complete kernel source.
-
Make sure that the kernel source is the exact version. Use
uname -r
to be sure.
-
VirtualBox may complain that VT-x is not enabled and no virtual machines can
be started. This is a BIOS setting, which requires a reboot (f2-advanced etc.). In
some BIOSes, it is called vmx. Search for virtual if your BIOS supprts searching.
For Vagrant, I dowloaded the latest version as a zip-file from
HashiCorp's download page.
The use of the latest is encouraged, because Vagrant has prblems with
versions of VirtualBox that are more recent than Vagrant.
6.9. Imagemagick
There are some issues with Imagemagic. Therefore, I downloaded the latest source
and did the magic incantations
./configure; make; sudo make install.
6.10. Ansible
First install Ansible with Python's pip:
sudo -s
easy_install pip
pip install ansible
A copy of the existing ansible trees under
/home/ansible
and
/etc/ansible
is made because I have some existing playbooks.
Next is the authentication. Of course, ssh-keys must be created
6.11. Webdav
I use an on-line storage cloud to safe-guard my data.
TransIP
offers this service via webdav.
Davfs2 is installable through gslapt. You must create the
group and user
davfs2
yourself. After that, just restore the directory
/etc/davfs2
to be able to re-access your drive.
If you did not yet have a webdav drive, you will probably need
to edit the files in
/etc/davfs2
to match your drive. They are extensively commented so that
should not be a problem.
Mount the drive with
sudo mount -t davfs https://your.disk.url /mnt/mountpoint 2>&1 | logger
7. Conclusion
I am now running Salix on my laptop and plain old Slackware on my
main server. The environment is rcck-solid. I upgraded the kernel
without problems.
The main annoyance is that most packages are either .dep or .rpm. That sometimmes
means that I have to install from source. However, most of the time, there is
someone who has done the work for me and II can easily install the .tgz.
Due to the much simpler installation method, the actual installation
of .tgz packages is blazingly fast, often less than half the time it took
to install a .rpm.
I'm less and less depending on Salix, and more and more on Slackware.
So Salix actually helped me to go back to the Slack!
8. Salix on Luks
8.1. Intro
If you have a laptop that you take with you some of the time, you will want
harddisk encryption. On Linux systems, that can be done with LUKS. However,
the installation process of Salix does not offer these facilities. Furthermore,
the installation process is simplified, so it is
not that easy to insert specific
steps.
First of all, it is assumed that you have a Salix install image, so
I won't go into the download of Salix. Second, you need a computer
to test with. I first tested this on a virtualbox, and it is a wise
approah to test is before disabeling all your computers.
8.2. Installation
After the boot, you will get some screens that ask for keymaps etc.
Then you get:

Select "Exit installation" here. You will be greeted with a prompt.
8.2.1. Partitioning the disk
First we will be partitioning the harddrive in two partitions:
In my virtualbox set-up, the installable disk is /dev/sda and at the beginning
it is completely empty.
Start
fdisk /dev/sda
and type:
-
n (for a new partition)
-
p (for a primary partition)
-
1 (the first)
-
press enter for the default first sector
-
+500M to create a partition of 500M
-
a (to make the partition bootable)
-
n to make the second partition
-
enter to accept all the defaults. This will create a partition for the rest of the disk.
-
w to write the partition table to the disk.
If you are paranoid, you will probably take the time to write
random bytes to your encrypted partition here. This is a good step
to keep forensics people in the dark, but it takes time, so
if you do a virtualbox test, you might skip that step.
dd if=/dev/urandom of=/dev/sda2
8.2.2. LVM and Luks
The second partition will be an encrypted volume group, with
two logical volumes, root and swap.
Now we get the partition ready for encryption:
root@salix64:/# cryptsetup -s 256 -y luksFormat /dev/sda2
WARNING!
========
This will overwrite data on /dev/sda2 irrevocably.
Are you sure? (Type uppercase yes): YES
Enter passphrase:
Verify passphrase:
root@salix64:/#
Next, we'll open the encrypted partition with:
cryptsetup luksOpen /dev/sda2 slackcrypt
This will open a partition
/dev/mapper/slackcrypt
that can be accessed as unencrypted.
On this partition, we'll create a physical volume group with:
pvcreate /dev/mapper/slackcrypt
and a volumgroup:
vgcreate cryptvg /dev/mapper/slackcrypt
And in that volumegroup a number of logical volumes:
lvcreate -L 25G -n root cryptvg
lvcreate -L 5G -n swap cryptvg
You will adjust the size to your specific situation.
The stuff we created need some nodes to find everything back:
vgscan --mknodes
vgchange -ay
And we'll created the swap-space:
mkswap /dev/cryptvg/swap
8.2.3. Install Salix
Now, we'll restart the set-up menu:
setup
In the screen for the PARTITIONS EDITOR, don't select any partitions, but
just select Go.
Setup will detect the swap-space
/dev/cryptvg/swap
so you might as well enable it.
For the root filesystem, select
/dev/cryptvg/root
because that will be your LVM root partition. Format it (I usually
format as ext4fs).
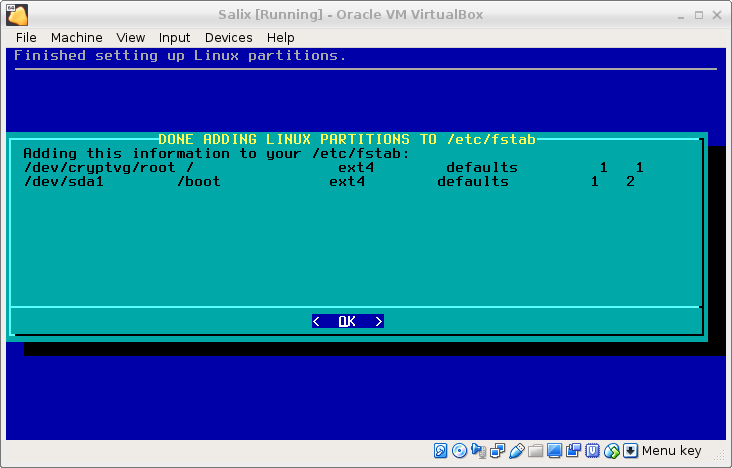
Next, add
/dev/sda1
as
/boot
because you will boot from an un-encrypted partition. Format
it. And then, select done. Your partition table will look like this.
The rest of the install is the standard Salix install. Because that is
so simplified, that it won't need any explanation.
After a while, you will come to the screen
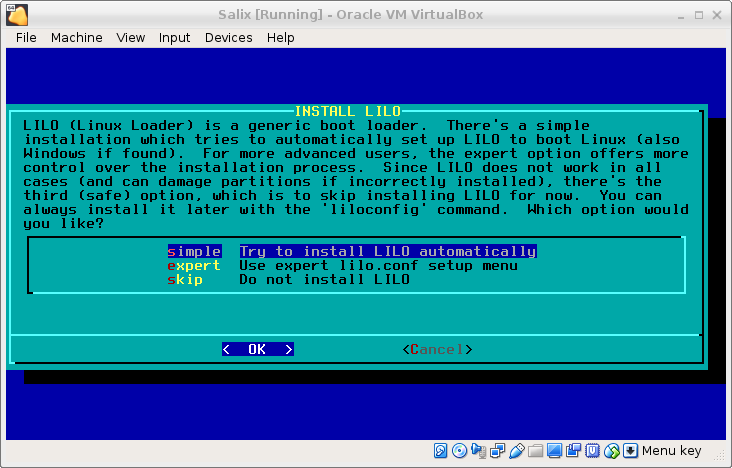
Select Expert and then Begin; accept a number of defaults, until
you get to the screen SELECT LILO TARGET LOCATTION. As target,
select MBR, select
/dev/sda
and choose your delay.
Now you have to select “Linux: Add a linux partition …” and select
/dev/cryptvg/root
to boot. (Yes,
/dev/cryptvg/root
not
/boot
) As Partition name, you might use "Salix".
Once that’s been selected, install lilo. It may throw a warning.
There are a number of additional steps in the standard installation:
-
hardware clock
-
timezone
-
numlock
-
user setup
-
etcetera
until you reach:
where we choose Exit to command line.
8.2.4. Fix boot
Now we have to fix lilo because of our encryption scheme.
First of all, run this:
chroot /mnt
Find out which kernel you are installing with
ls /lib/modules
It will be someting like 3.10.17 or 4.4.14. Next type:
mkinitrd -c -k *insert kernel number* -m *insert ROOT file system type
here* -f *insert root file system type here* -r /dev/cryptvg/root -C
/dev/sdx2  -L
For me (Salix 14.2), that was:
mkinitrd -c -k 4.4.19 -m ext4 -f ext4 -r /dev/cryptvg/root -C /dev/sda2 -h /dev/cryptvg/swap -L
The -h should allow hybernation.
Edit Lilo's config-file
vi /etc/lilo.conf
and make the image-section look like:
image = /boot/vmlinuz
  initrd = /boot/initrd.gz
  root = /dev/cryptvg/root
  label = Salix
  read-only
  append = "vt.default_utf8=0 resume=/dev/cryptvg/swap"
Check with
ls /boot
if the image and initrd are there. Run
lilo
and reboot.
The boot process will throw some error messages about modules that cannot
be loaded. I'm working on how they should be solved. But the boot process
will ask for the passphrase to unlock the encrypted volume, and, when the
passphase is given, it will present the system on the encrypted volume.